Creating Standard Drawings

Contents
Process:
•Importing Standard drawings
•Creating Standard drawings with their parameters. These specifications are stored in the ProSig project.
•Assignment of Standard drawings to SCT elements.
Requirements:
Description:
The Standard drawing is a logical object in ProSig. Standard drawings and their parameters can be created manually. Existing standard drawings can be imported from a PlanPro XML.
Standard drawings are used for the following objects:
•Signal (Signal mount)
•Crossing/Slip switch (Switch element)
•Track closure (Switch component)
•Switch (Switch component)
In the PlanPro glossary, the object is formulated as follows:
Standard drawing
Standard drawings are used to ensure uniform construction designs for certain objects.
The Standard drawings required for the SCT applications in the data model, are listed in a standard drawing table.
Standard drawings can have any number of parameters in addition to the picture, which specify the construction execution for a specific application more precisely. The validity of the parameters for a concrete application in a standard drawing can only be determined with the help of the Plausibility and Admissibility check (PlaZ).
(Source: PlanPro Glossary)
Procedure:
1.Start the Standard Drawing Editor.
oTo import an existing standard drawing from a template continue with Step 2.
oTo manually create a new standard drawing continue with Step 3.
oTo manually create parameters for an existing standard drawing, continue with Step 5.
oTo assign an existing standard drawing to an object, continue with Step 8.
Command: PRS_REGELZEICHNUNG
Ribbon: ProSig EPU -> Planning Basis -> Standard Drawings
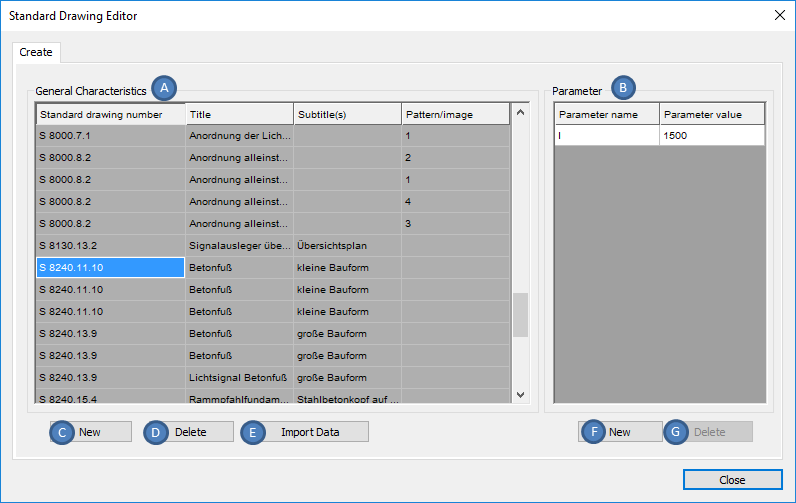
Illus.: Standard Drawing Editor with existing Standard Drawings and Parameters
oExisting Standard drawings are displayed in the area 'General Characteristics' (A).
oAfter marking an existing standard drawing, associated parameters are displayed in the 'Parameters' area (B).
2.If an XML file is available that contains information on standard drawing, or if standard drawing has already been planned for another project and exported to a PlanPro XML via the PlanPro export, it can be imported from this XML into the current project via the 'Import Data' (E) button.
3.With the button 'New' (C) a new standard drawing can be created.
oThe newly created standard drawing is inserted at the top of the list (A).
4.After selecting the newly created standard drawing in the list (A), all corresponding characteristics must be specified as attributes.
oFor the correct completion of the characteristics the Tooltips are to be considered.
5.Any number of parameters can be created for an existing standard drawing to describe the specific application. To append parameters to a standard drawing, mark it in list (A). If no parameters are to be created, continue with Step 8.
6.With the button 'New' (F) parameters for a standard drawing can be created.
oThe newly created parameter is inserted at the top of the list (B).
7.After selecting the newly created parameter in the list (C), the corresponding attributes must be specified.
oFor the correct input of the parameter attributes the tooltips have to be used.
8.The Allocation of a standard drawing to an object can be done with the functions Edit Object(s) or Edit Object for the selected object. The allocation can also be done with the function Edit Object Type for all objects of an Object Type.
Command Line: OE
Ribbon: ProSig -> Tools -> Edit Object(s)
Command Line: DBATTE
Ribbon: ProSig -> Tools -> Edit Object
9.For the 'Standard drawing' attribute of an object, the corresponding standard drawing number can be assigned using a selection list:
oFor Single slip, Double Slip and Switch diamond the allocation takes place in the Switch Element (I).
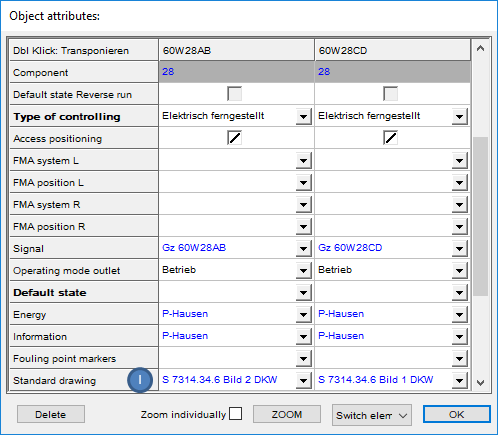
Illus.: Allocation of the Standard drawing for a Double Slip crossing
oFor Switches, the allocation takes place in the Switch Components (J).
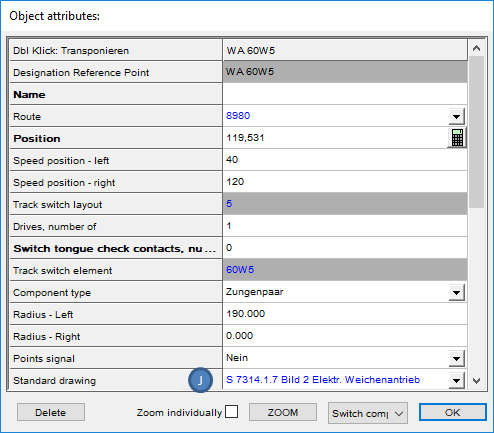
Illus.: Allocation of the Standard Drawing for a Switch with the Component Type Zungenpaar
oFor Signals, the allocation takes place in the signal mounting (L).
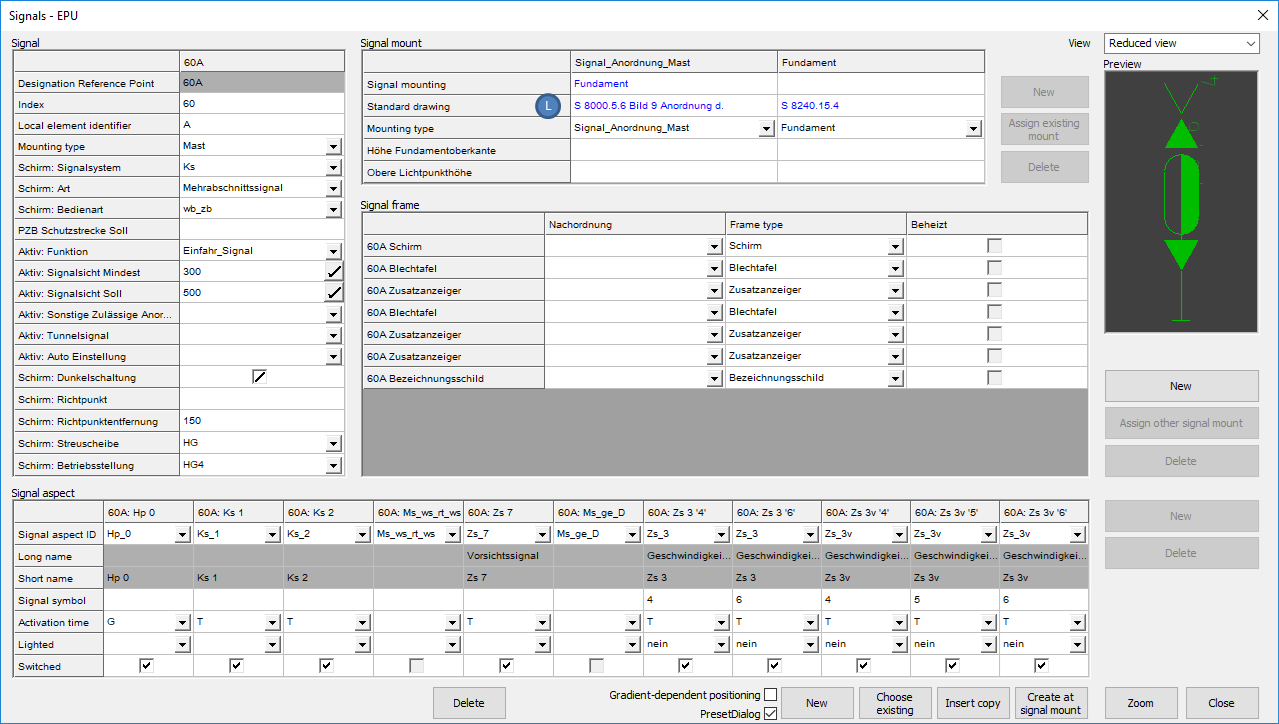
Illus.: Allocation of the Standard drawing for the Signal
▪The Standard drawing for the signal is specified in the Signal Mounting with of the following Mounting types 'Signalanordnung Mast', 'Signalanordung Arbeitsbühne', 'Signalanordnung Sonstige'.
▪The Standard drawing for the foundation is specified in the Signal mounting with the Mounting type 'Fundament'.
▪For the Mounting Type 'Mast', 'Pfosten', 'Rahmen', 'Schienenfuss', 'Signalausleger' und 'Signalbruecke' a new signal mounting must be created and then the corresponding standard drawing must be specified.
▪The allocation of one or more standard drawings can also be performed by right-clicking on the 'Standard drawing' attribute (L) and activating the context menu. See also Editing And Displaying Complex Data - Assigning Objects via Dialog.
oFor Derailers, the allocation takes place in the Switch component (M).
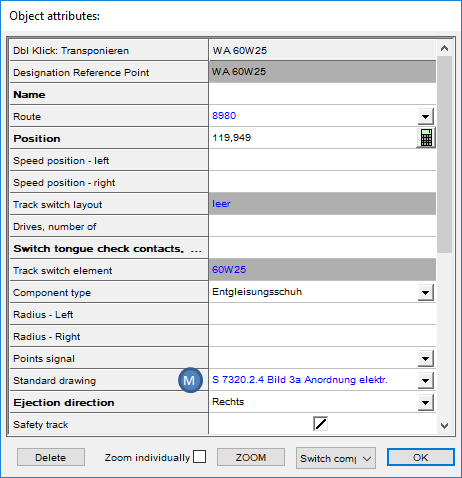
Illus.: Allocation of the Standard drawing for a derailer
10.After marking a parameter for a standard drawing in the area 'Parameter' (B) it can be deleted with the button 'Delete' (G). If the corresponding Standard drawing is allocated to an object, this allocation is retained. The specification of the standard drawing is then displayed in the attributes of the object without the parameter name and parameter value.
11.After marking a standard drawing in the area 'General Characteristics' (A) it can be deleted with the button 'Delete' (D). The Standard drawing is removed from the list with its corresponding parameters. The parameters of the Standard drawing are also deleted automatically. If the Standard drawing was allocated to an object, the corresponding attribute is empty after deleting the Standard drawing.