Assigning the Route Data

Contents
Process:
•Assigning topological edges to the corresponding line.
Requirements:
Description:
The Line determines the line assignment for topological edges. When importing the chainage axis, route objects are automatically created. Thereafter, the corresponding topological edges are assigned to each route object.
After assigning the Route data, newly inserted objects are automatically added to the topology with respect to the corresponding line and chainage information.
Supporting video sequence:
Streckendaten_zuweisen.mp4 (Size: 14,7 MB)
Procedure:
1.Start the Edit Object Type function and select the object type 'Line'.
Command Line: PRS_OEA
Ribbon: ProSig EPU -> Tools -> Edit Object Type
2.Right-click on the value cell of the 'Edges' attribute (A) to open the context menu.
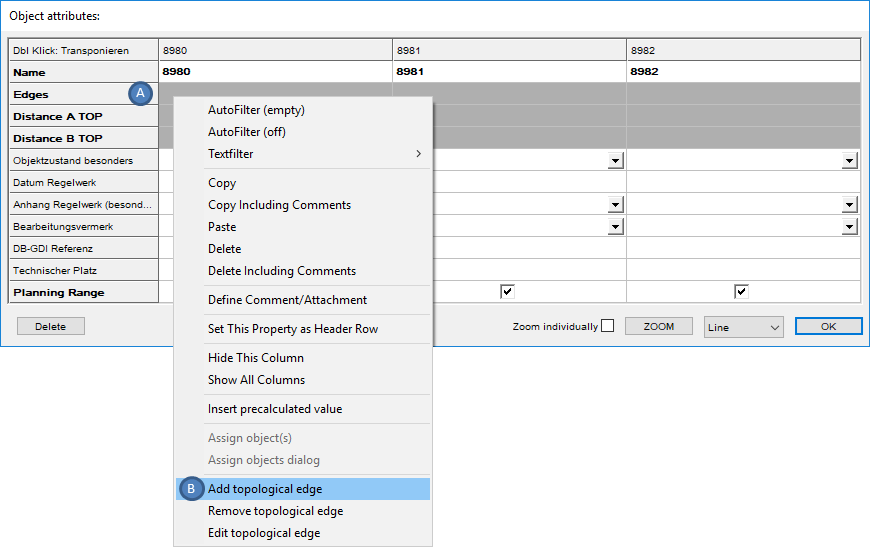
Illus.: Switch to the context menu for assigning topological edges
3.By clicking on the menu item 'Insert topological edge' (B) and selecting one or more topological edges in the drawing, the selected edges can be assigned to the route object. To edit Area Objects, refer to the description under PSO Area Object - Edit.
oThe topological edges that reflect the progression of the Chainage axis of the line need to be selected. After confirming the selection with the Enter key, the 'Edges' attribute (A) includes links to the selected topological edges.
4.The steps 1 to 3 need to be repeated for each route object existing in the project.
5.With the function Check Topological Edges, it is necessary to check whether the assignment of the topological edges corresponds to their lines correctly. Any topological edges that are not assigned or assigned to more than one line are reported.
Command Line: PRS_PRUEF_KANTEN
Ribbon: ProSig EPU -> Tools -> Verify -> Check Topological Edges