Creation and Management of Attachments
Process:
•Creating and assigning attachments to ProSig objects
•Creating and assigning attachments to Comments
•Managing documents as attachments to the ProSig project
Requirements:
Description:
Attachments can be used in ProSig in two ways. They can either be linked to an object by a comment using the attributes or as with certain objects, they can be integrated directly into the attributes (e.g. by using the INA attributes in the PZB/INA editor). The Attachment object can be used to store information in the ProSig project that cannot be mapped by ProSig objects. This information corresponds to the paper-based process.
The following file types can be used as attachments:
•TIF
•JPG
•PNG
•MPEG
In the PlanPro glossary, the object for representing an attachment is formulated as follows:
Attachment
Includes the attachment documentation into the model.
The Attachment object allows information to be stored in the PlanPro data model from existing files that are not represented by their respective object in the model. This information corresponds to the attachments included in the previous paper-based process. The permitted types of attachments are defined in the 'Attachment Type' attribute. The file name of the original file is stored in the 'File Name' attribute without the extension. The allowed extension is defined in the 'File Type' attribute. The actual content of the source file is stored in the attribute 'Data' as a base64-coded binary data
An attachment is used in the data model in two ways. In the first case, an attachment can be linked to any object or attribute using the object 'Edit Note'. This is explained in more detail in the description of the object Edit note. Special attachments that must be contained directly in an object during planning, e.g. INA calculation, are defined directly by attributes in the respective object and thus integrated without the indirect editing note.
(Source: PlanPro Glossary)
Procedure:
1.To create and edit an attachment in the project (e.g. for the INA calculation) continue with Step 2.
To create and assign an attachment to a comment, continue with Step 3.
To assign one or more attachments to a project object, continue with Step 4.
2.The 'Attachments' function can be used to create or edit an attachment in the project.
Command Line: PRS_ANHANG
Ribbon: ProSig EPU -> Planning Basis -> Attachments

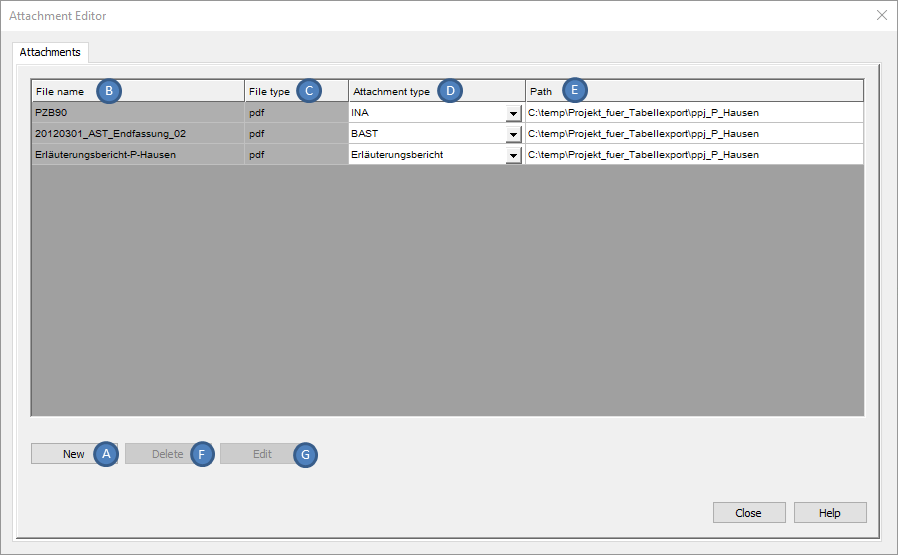
Illus.: Dialog 'Attachment Editor'
oIf attachments already exist in the project, they are displayed in the dialog.
oA new attachment can be created via the 'New' (A) button. The file for the attachment must be selected using the file selection dialog.
oThe attributes 'File name' (B), 'File type' (C) and 'Path' (E) are automatically assigned after selecting the file.
oThe 'Attachment type' attribute (D) is used to specify the information about the technical content of the attachment.
oAfter selecting an attachment in the dialog, it can be removed from the project via the 'Delete' button (F).
oAfter selecting an attachment in the dialog, a new file can be assigned to it via the file selection dialog using the 'Edit' button (G).
3.To assign an attachment to a comment, you can either use the 'Comments' function or, when assigning a comment to a attribute, use the Comment/Attachment Editor. See also Creating and Assigning Comments.
Command Line: PRS_KOMMENTAR
Ribbon: ProSig EPU -> Planning Basis -> Comments
4.The assignment of one or more attachments to an object can be done using the function Edit Object(s). The assignment can be executed by right-clicking on the corresponding value field and opening the context menu. See also Editing And Displaying Complex Data - Assigning Objects via Dialog.
Command Line: OE
Ribbon: ProSig EPU -> Tools -> Edit Object(s)
